Deploying apps
A complete, no-experience-needed walkthrough for creating an instance of any Marketplace app — every field explained, for all three deploy types.
This page is the complete, step-by-step guide to creating an instance of any app in the Marketplace — written for someone who has never deployed anything to the cloud before. It explains every word, every field, and every screen you will see.
Before you start: words you'll see
A few words come up again and again while deploying an app. Here is what each one means in plain language, before you run into it on screen.
| Term | What it means |
|---|---|
| Console (or dashboard) | The website you log into to manage everything on NevTan — creating apps, databases, and more — instead of typing commands. |
| Deploy / deployment | Taking a piece of software and making it live and running, so it is actually reachable and usable. "Deploying an app" means publishing it. |
| Instance | One running copy of an app or database, set up just for you. "Creating an instance" means bringing one of these to life. |
| Container | A self-contained package that bundles an application with everything it needs to run — its code, its libraries, its settings — so it behaves the same no matter where it runs. |
| Provisioning | The behind-the-scenes work of setting up the actual servers, storage, and networking for your instance after you click Deploy. It takes a little time, and the console shows its progress. |
| Region | The physical location (a data center) where your instance's servers actually live. Picking a region near your users makes your app feel faster for them. |
| Resource preset (vCPU / RAM) | How much computing power your instance gets. vCPU is a slice of processing power — think of it as a share of a computer's brain. RAM is short-term memory a program uses while it runs. More of each means more capacity, at a higher cost. |
| Environment variable | A small setting — a name and a value — that you hand to a running app without changing its code. Commonly used for passwords, keys, or on/off switches. |
| Credentials | The username and password (or secret key) needed to log into or connect to something. |
| Trusted source / IP allowlist | A list of specific internet addresses allowed to connect to something private, like a database. Anything not on the list is turned away. |
| Subdomain | An address that sits in front of a shared domain name — for example "myblog" in myblog.apps.nevtan.com — so you get a working web address without owning your own domain. |
| Custom domain | Your own web address (like www.mystore.com) that you point at something you've deployed, instead of using the address NevTan gives you automatically. |
| DNS record | An entry you add at your domain registrar (wherever you bought your domain) that tells the internet where your domain should point. NevTan tells you exactly which record to add when you attach a custom domain. |
| Team / workspace | A shared space where more than one person on the same account can see and manage the same resources together. |
The three ways a Marketplace app deploys
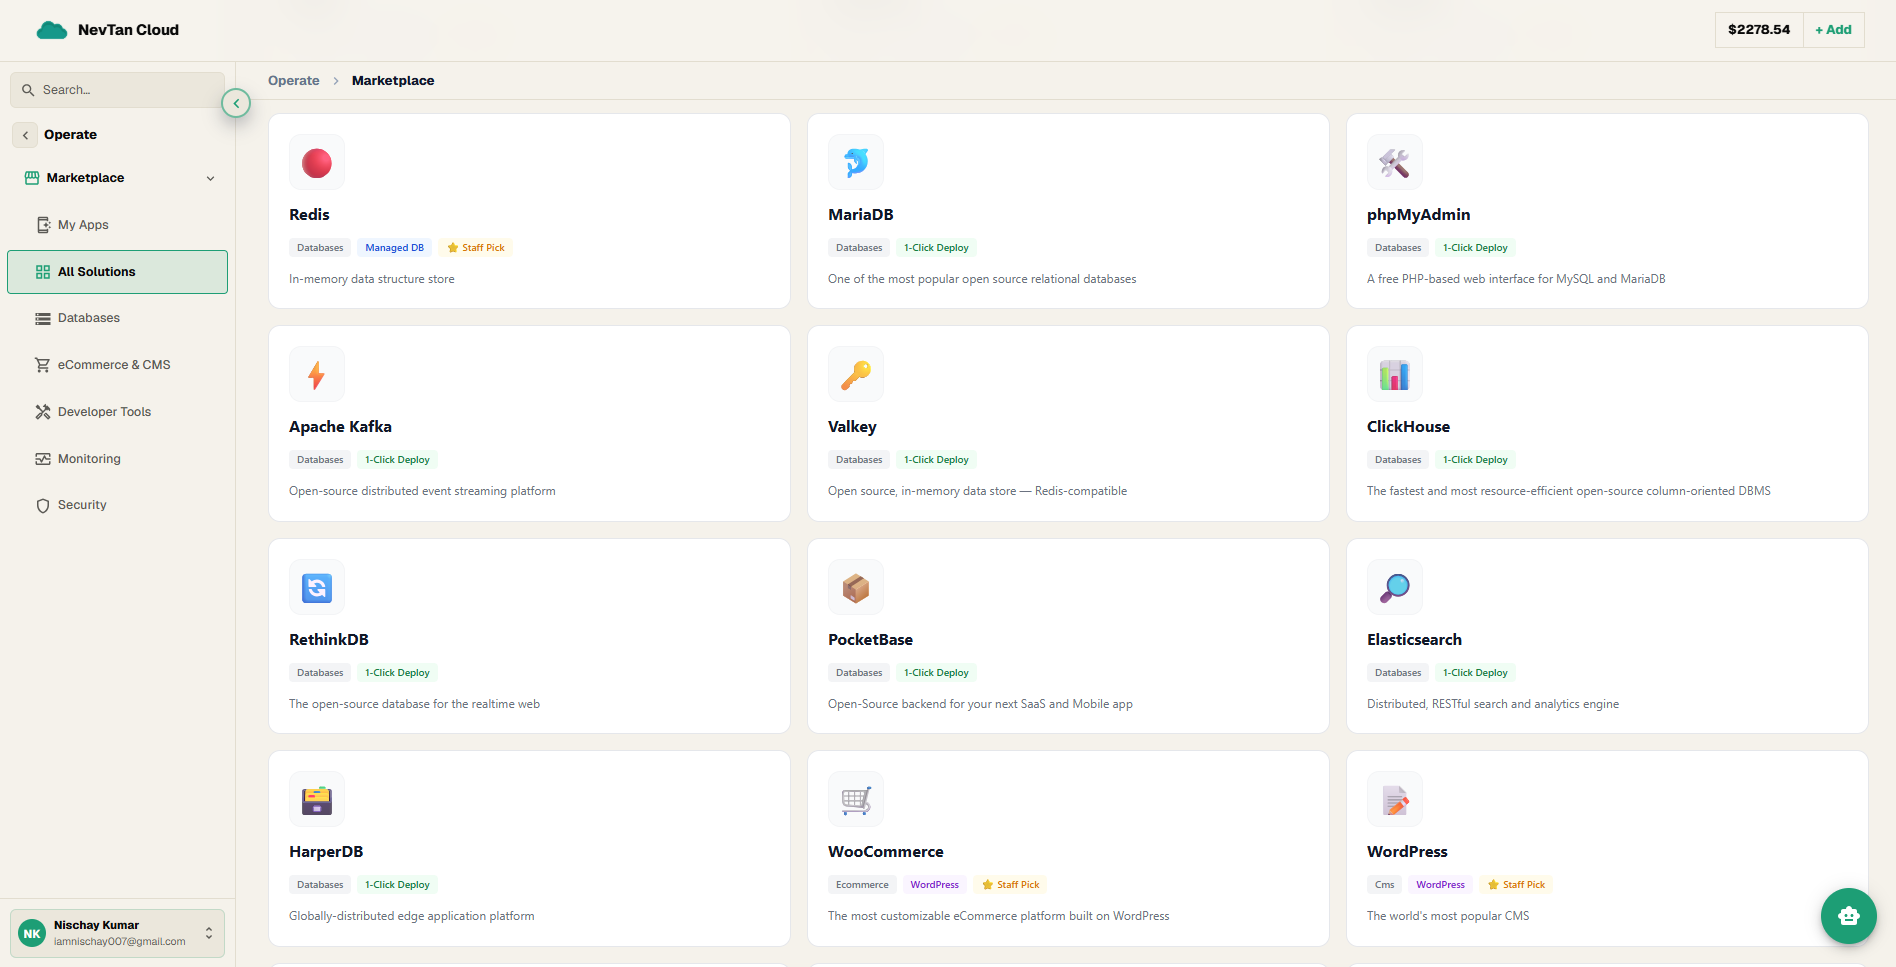
Every one of the 26 apps in the catalog falls into one of three deploy types, shown as a colored badge on its card. The badge tells you which of the three guides below to follow — the fields you'll be asked to fill in depend entirely on this, not on which specific app you picked.
| Badge | Which apps | What you'll fill in |
|---|---|---|
| Managed DB | MySQL, PostgreSQL, MongoDB, Redis | A short form: database name, username, network, region, and size. See Guide 1 below. |
| 1-Click Deploy | Every other app — from MariaDB and Grafana to Gitea and n8n | An even shorter form: a name, a region, and a size. See Guide 2 below. |
| WordPress | WooCommerce, WordPress | A separate, dedicated WordPress installer with its own domain, database, and admin-account setup. See Guide 3 below. |
Guide 1: Creating a Managed Database instance
This guide covers the four Managed DB apps: MySQL, PostgreSQL, MongoDB, and Redis. "Managed" means NevTan takes care of running and generates a password for the database for you — you only decide its name, who can connect to it, and how big it should be.
- 1Open the MarketplaceFrom the console's sidebar, click Marketplace under the Operate section. You'll see a search bar at the top and a grid of app cards below it, each with a name, an icon, and a badge like "Managed DB" or "1-Click Deploy".
- 2Find your database engineUse the Databases category link on the left, or type the engine's name (e.g. "PostgreSQL") into the search bar at the top. Every Managed DB app carries a blue Managed DB badge on its card.
- 3Click the app's cardClicking a card opens a panel that slides in from the right-hand side of the screen. This panel is both the app's name/type and the form you'll fill in — there is no separate "read more first" page to visit before this.
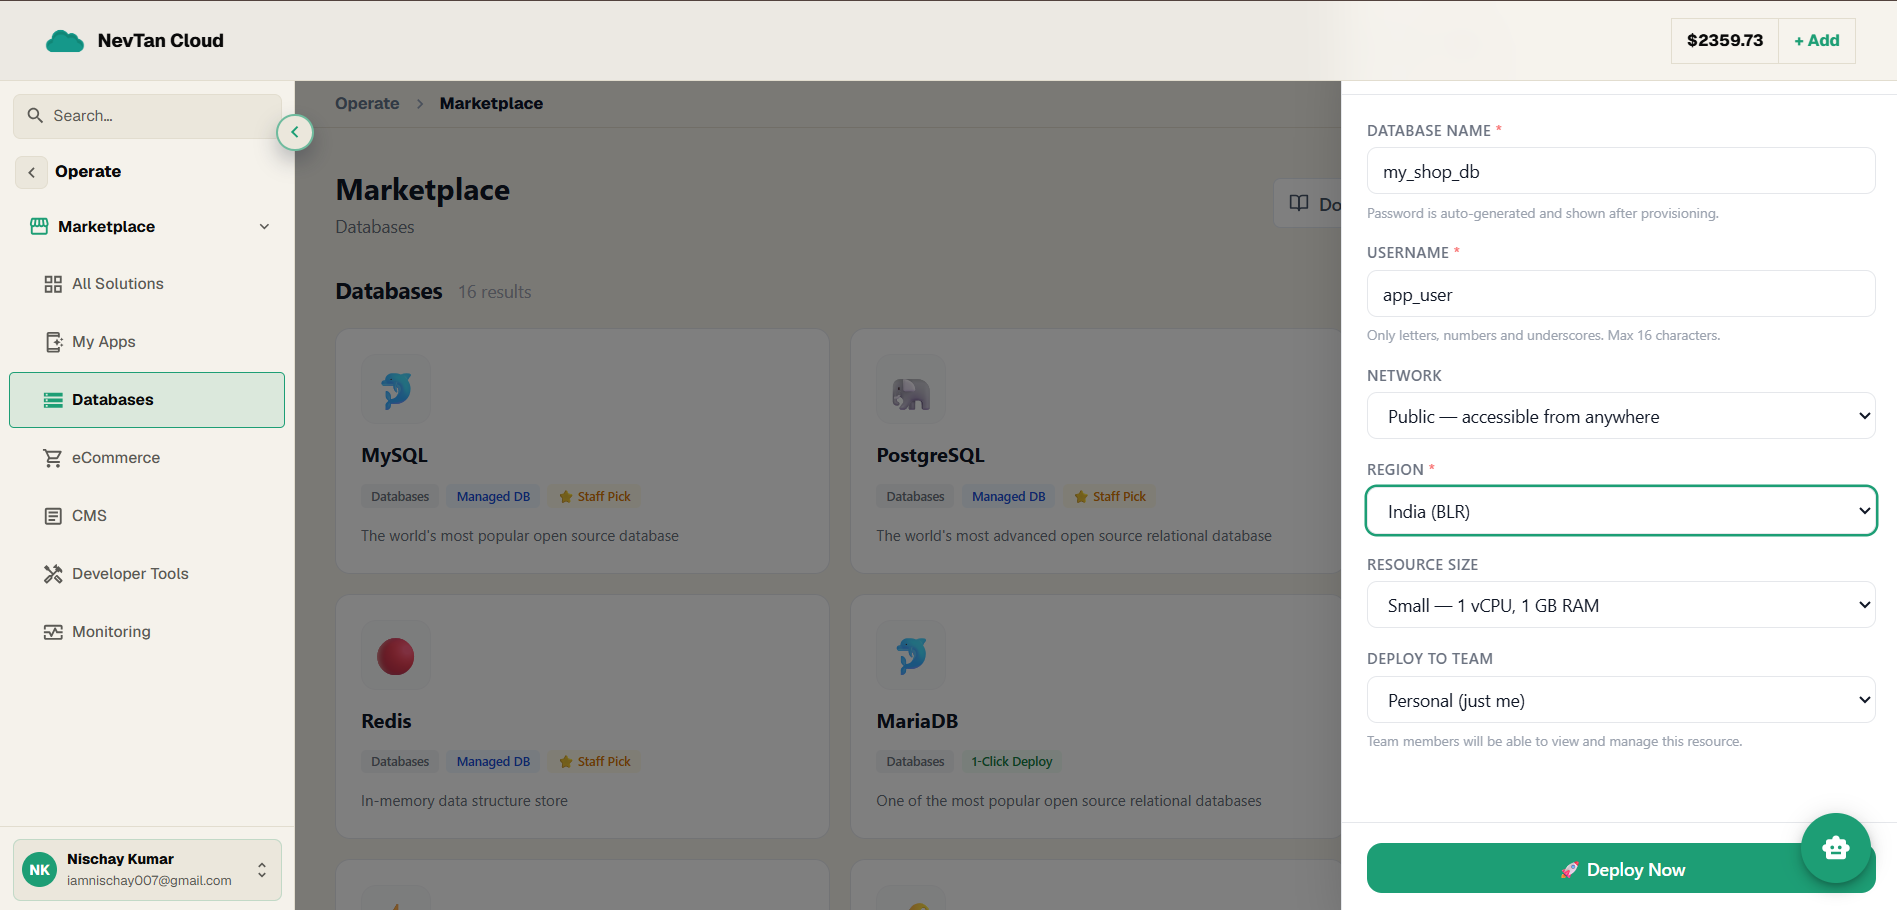
- 4Fill in the Database NameType a name for your database, for example
my-shop-db. This is required, and it's just a label to help you recognize this database later in your list of databases — it does not need to match anything else. - 5Fill in the UsernameType a username for the database account NevTan will create for you, for example
app_user. This is required. It can only contain letters, numbers, and underscores, and must be 16 characters or fewer. This is not your NevTan login — it's a separate account just for this database. - 6Choose the NetworkPick Public if you want the database reachable from anywhere on the internet — access is still gated by the username and password from the steps above, but there's no separate address allowlist. Pick Private network if it should only be reachable from other things running inside NevTan, which unlocks an extra field for narrowing that down further (see the next step). If you're not sure, Public is the simpler starting choice.
- 7Optionally set Trusted IPsThis field only appears if you chose Private network. It lets you list specific internet addresses (IPs or CIDR ranges — a way of describing a whole block of addresses at once) allowed to connect. Leave it blank to allow anything on the private network to connect; fill it in to narrow that down further.
- 8Choose a RegionOpen the Region dropdown and pick the data center location closest to where your users or your app actually are. This field is required — you cannot deploy without picking one.
- 9Choose a Resource SizePick Small (1 vCPU, 1 GB RAM), Medium (2 vCPU, 2 GB RAM), or Large (4 vCPU, 4 GB RAM). If you're just trying this out or building something small, Small is a reasonable starting point — you are not locked into this choice forever.
- 10Optionally choose a TeamIf your account belongs to one or more teams, a Team dropdown appears, defaulting to "Personal (just me)". Pick a team here if you want everyone on that team to be able to see and manage this database too.
- 11Click "🚀 Deploy Now"This button sits at the bottom of the panel and stays disabled (greyed out) until every required field above is filled in. Once you click it, NevTan starts creating your database.
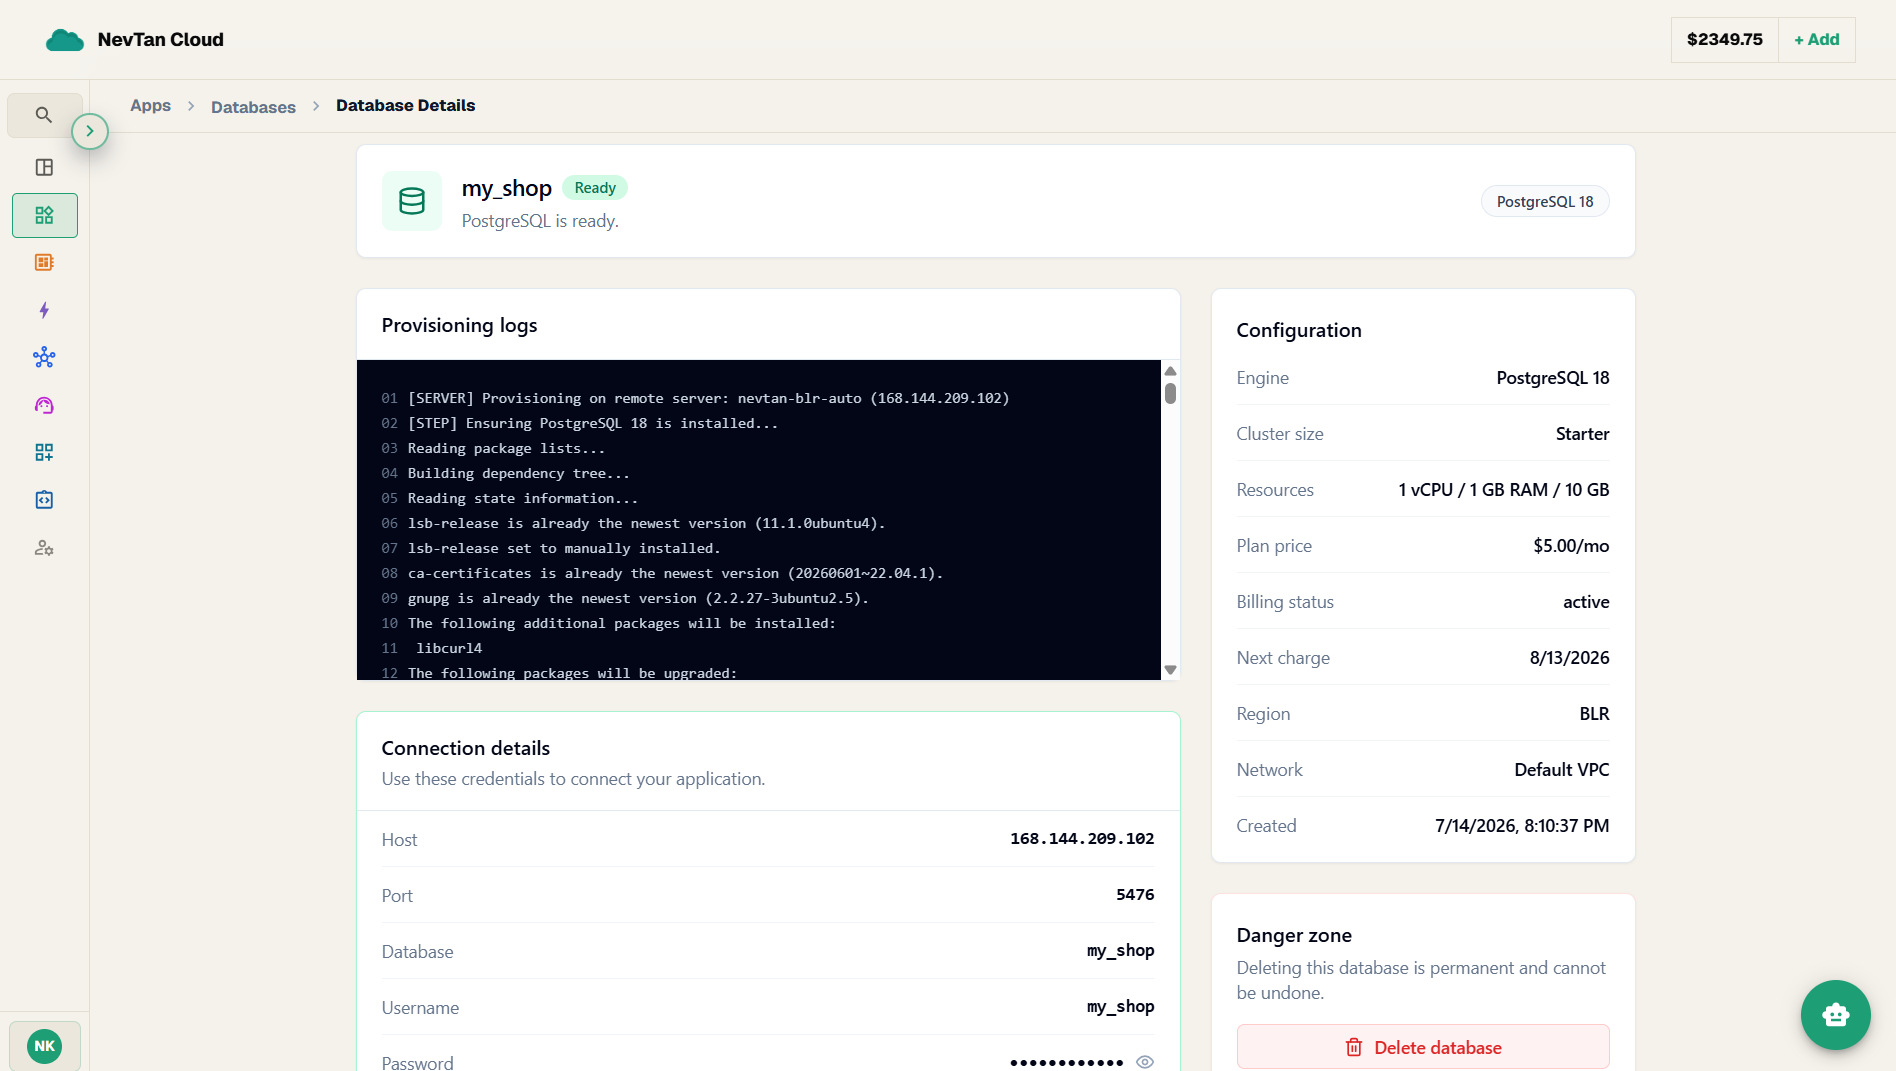
After deploying (database)
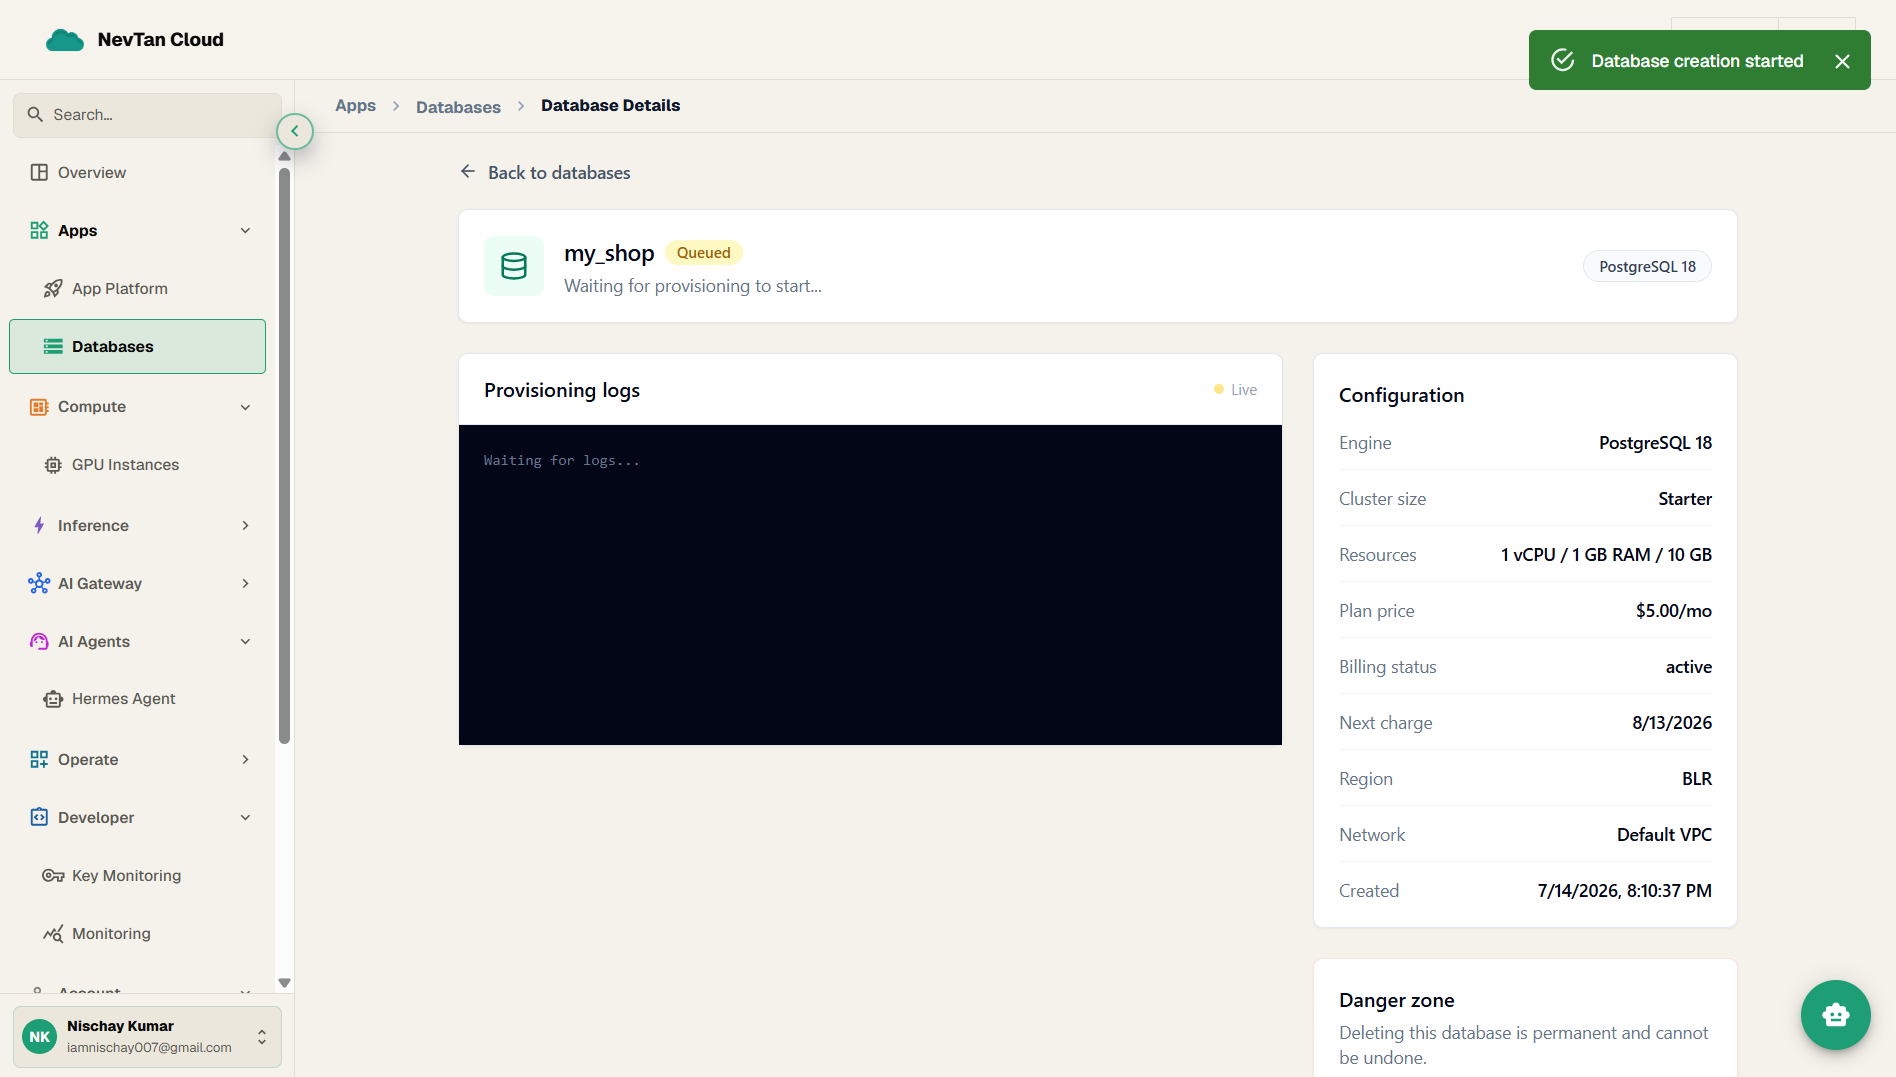
The panel stays open and shows a colored status badge that updates on its own — you don't need to refresh the page. Here is what each status means:
| Status | What it means |
|---|---|
| queued | Your request is waiting for a slot to start being worked on. |
| pulling | The database software is being downloaded onto a server. |
| starting | The server has the software and is starting it up. |
| provisioning | The surrounding pieces — networking, storage — are still being connected together. |
| ready | Your database is fully set up. Its connection details (see below) are now available. |
| failed | Something went wrong. Open the database's page for more detail, or try again with a different region or resource size. |
Your connection details
When the status reaches ready, the panel reveals a Connection Details box with everything another program needs to talk to your new database:
- Host — the address of the server your database lives on.
- Port — a number that, together with the host, pinpoints exactly which service to talk to on that server.
- Database — the name you gave it in step 4.
- Username — the account name you gave it in step 5.
- Password — generated automatically for you. It's hidden by default (shown as dots); click the eye icon to reveal it, or the copy icon to copy it without ever displaying it on screen.
- URI — a connection string that bundles all of the above into one line that most database tools and programming languages can accept directly, so you rarely need to type out each piece by hand.
Guide 2: Creating a 1-Click Deploy instance
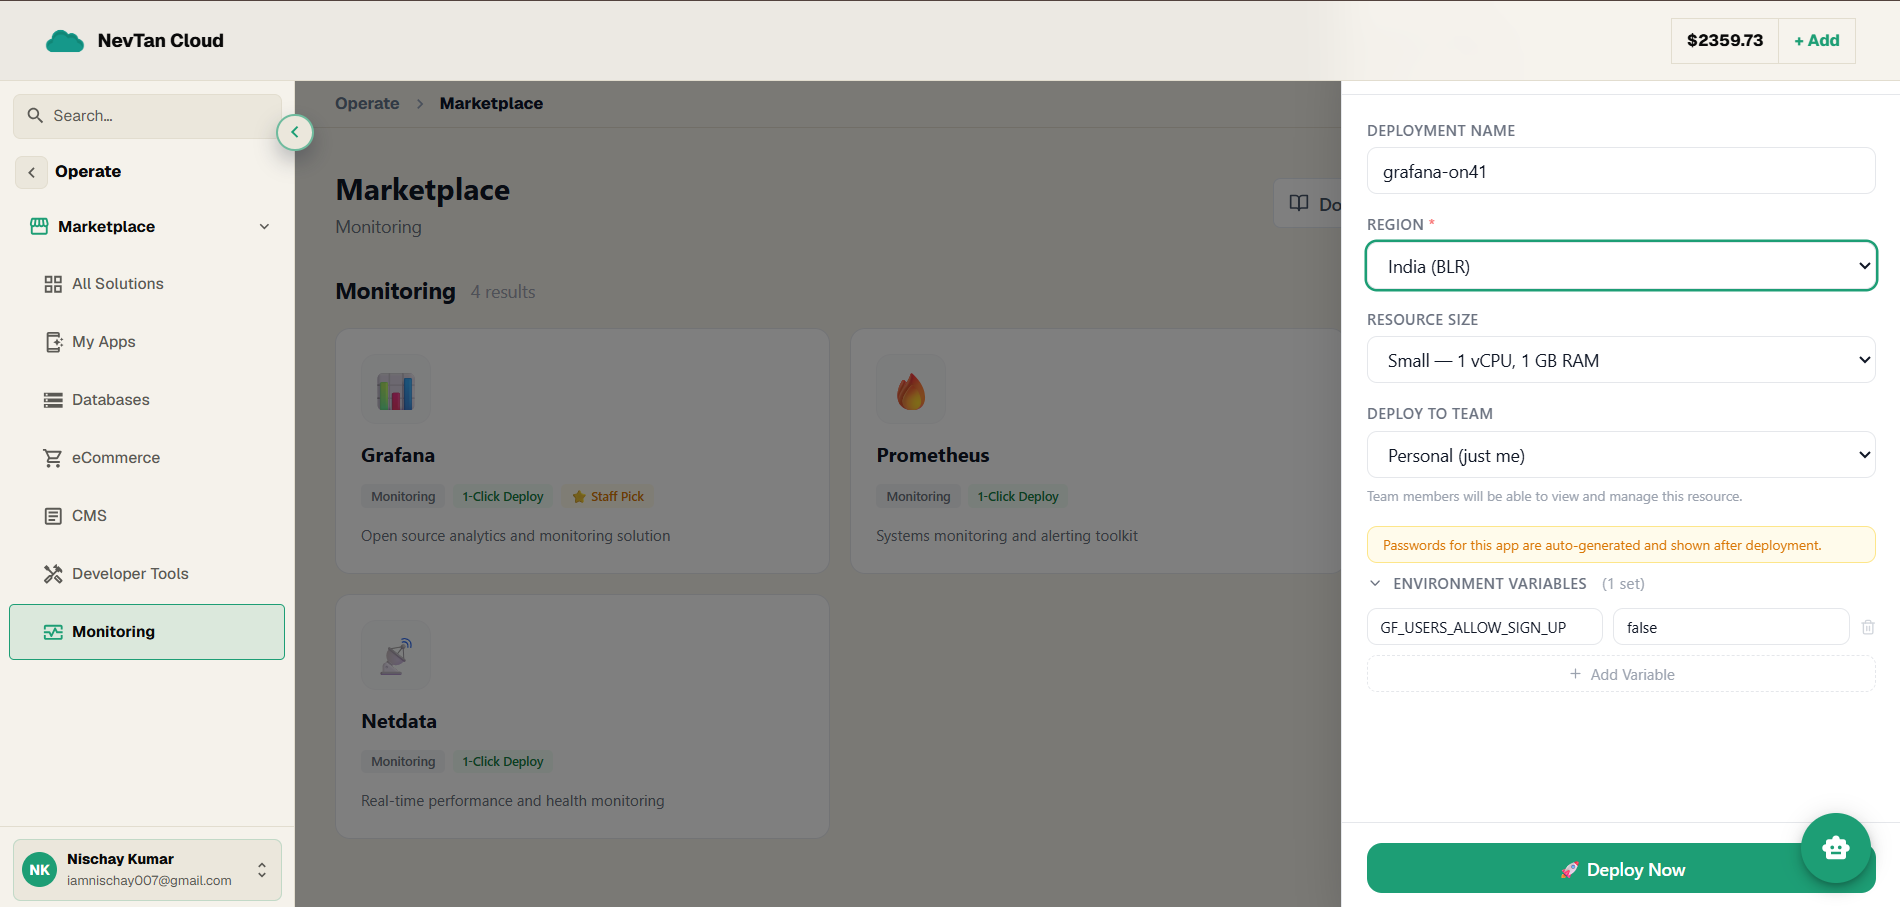
This guide covers every app carrying the green 1-Click Deploy badge — twenty apps, including things like Grafana, Gitea, Vaultwarden, and n8n. Despite the variety, every one of these apps uses the exact same short form to deploy — only the app itself differs.
- 1Open the Marketplace and find the appFrom the sidebar, click Marketplace, then browse a category or search by name. Every 1-Click Deploy app carries a green 1-Click Deploy badge on its card.
- 2Click the app's cardA panel slides in from the right with the app's name and icon at the top, and the deployment form below it.
- 3Check the Deployment NameNevTan pre-fills this with the app's name plus a few random characters (for example
grafana-x7k2), so it's already unique. You can leave it as-is or change it to something you'll recognize more easily later. - 4Choose a RegionOpen the Region dropdown and pick where this instance should run. This is required.
- 5Choose a Resource SizePick Small (1 vCPU, 1 GB RAM), Medium (2 vCPU, 2 GB RAM), or Large (4 vCPU, 4 GB RAM), based on how much traffic or work you expect this instance to handle.
- 6Optionally choose a TeamIf you belong to a team, pick it here to share this deployment with your teammates instead of keeping it personal.
- 7Optionally review Environment VariablesClick the "Environment Variables" row to expand it. Some apps pre-fill a few default settings here (for example, ones the app needs to start up); you can change any value, remove a row, or click "+ Add Variable" to add your own. If a note about auto-generated passwords appears here, it means this particular app will generate and show you a password after it deploys, rather than asking you to set one now.
- 8Click "🚀 Deploy Now"This creates the instance and begins provisioning it, right inside the same panel.
After deploying (1-Click app)
The same status badge you'd see for a database appears here too, with one difference: instead of turning ready, a 1-Click app turns running once it's reachable.
| Status | What it means |
|---|---|
| queued | Your request is waiting for a slot to start being worked on. |
| pulling | The app's container image — its packaged software — is being downloaded onto a server. |
| starting | The server has the image and is starting the app up. |
| provisioning | The surrounding pieces — networking, storage — are still being connected together. |
| running | The app is up and reachable at its own web address. |
| failed | Something went wrong. Open the deployment's logs for detail, or try again with a different region or resource size. |
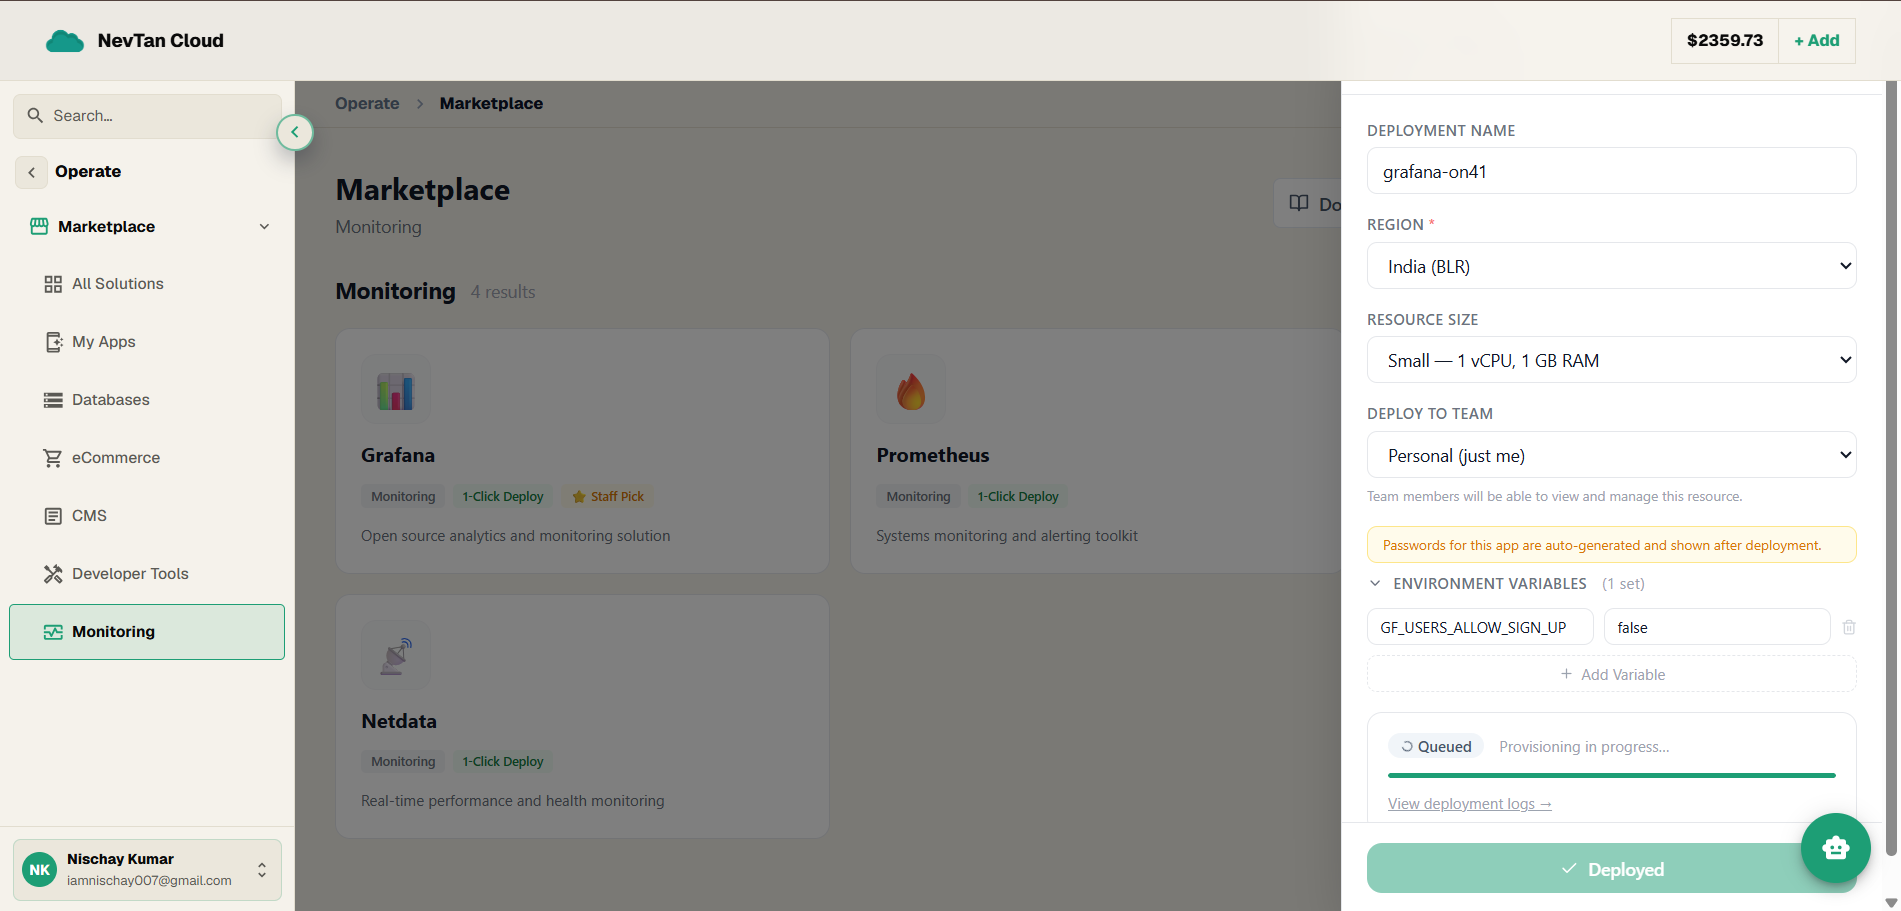
Once running, the panel shows a clickable link to the app's live web address, plus a View deployment logs → button that takes you to its ongoing logs.
Guide 3: Deploying WooCommerce or WordPress
WooCommerce and WordPress are the two apps carrying the purple WordPress badge. Clicking Deploy on either one does not open the short form from Guide 2 — instead, it closes that panel and opens a separate, dedicated WordPress Deployment window, because setting up WordPress genuinely needs more information (its own domain, database, and admin account).
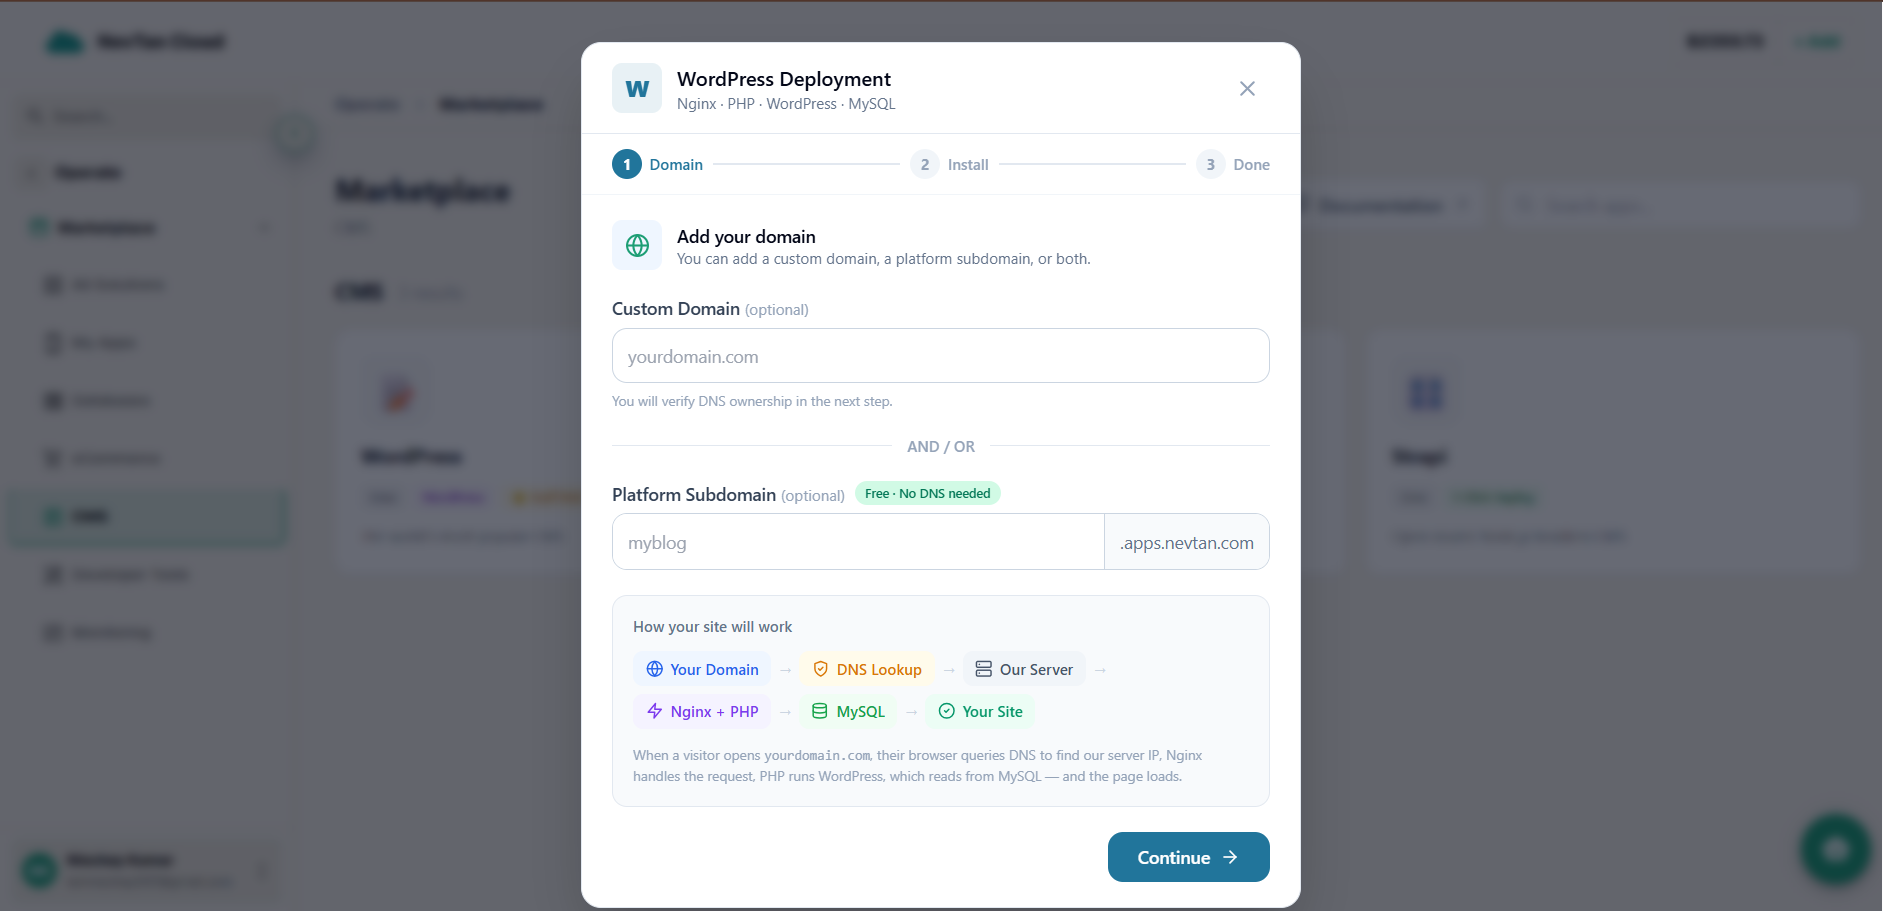
Step 1 — Add a domain. You need at least one address for your new site — a domain you already own, a free NevTan subdomain, or both.
- 1Custom domain (optional)If you own a domain already (like
mystore.com), type it into the Custom Domain field. You'll confirm you actually own it in the next step. - 2Platform subdomain (optional)Type a name into the Platform Subdomain field, for example
myblog— NevTan completes the address asmyblog.apps.nevtan.comfor you. As you type, the console checks — in real time — whether that name is already taken, showing "Checking availability…", "Available", or "Taken — try another." - 3Click ContinueYou must fill in at least one of the two fields above. If you only used the free subdomain, there's no DNS to verify, so you're taken straight to Step 3. If you entered a custom domain, you move to Step 2 next.
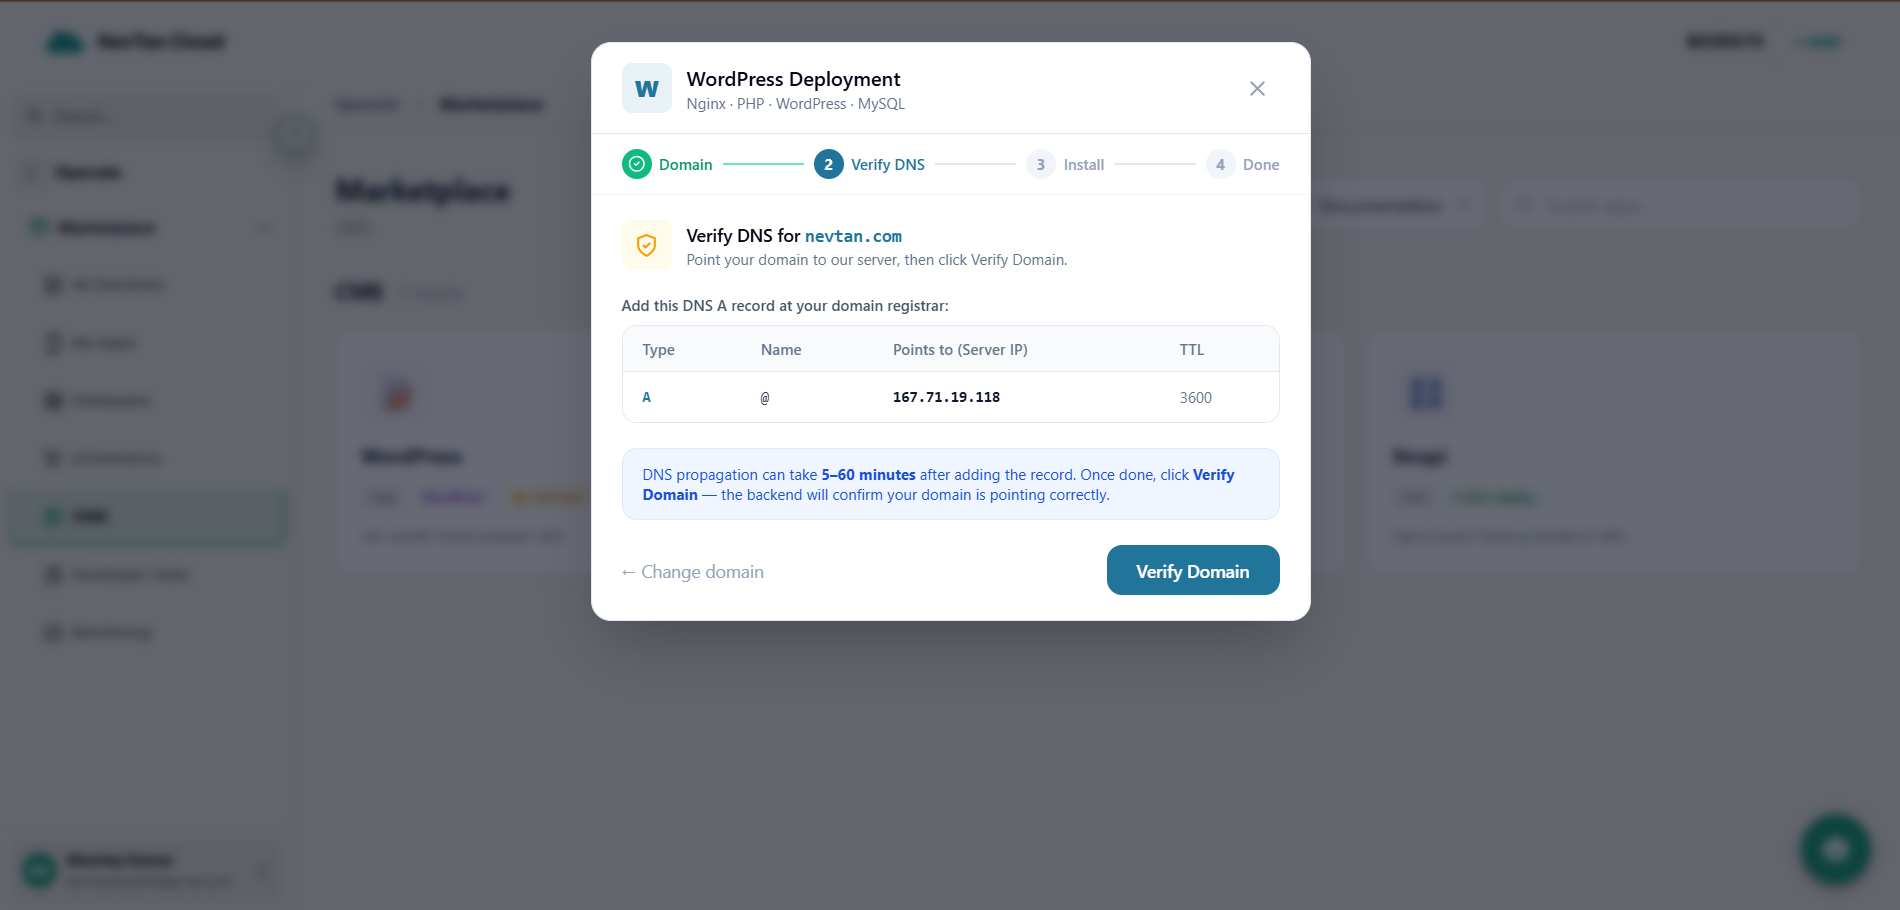
Step 2 — Verify DNS (custom domain only). This step only appears if you entered a custom domain in Step 1. WordPress can't go live on your domain until you prove you actually control it, by pointing it at NevTan's server.
- 1Copy the DNS record NevTan shows youThe screen displays a table with a Type of
A, a Name of@, and a Points to value that is NevTan's server address for your site. - 2Add that record at your domain registrarLog into wherever you bought your domain (this is outside of NevTan) and add an A record matching exactly what NevTan showed you.
- 3Wait for DNS to spreadThis can take anywhere from a few minutes to about an hour. This waiting period is normal and outside NevTan's control — it depends on your domain registrar.
- 4Click Verify DomainNevTan checks whether your domain now points to its server. If it does, you'll see a green "Domain verified!" message and a new Continue to Install button — click it to move to the next step. If not, you'll see a message explaining that it isn't pointing correctly yet — wait a little longer and click Verify Domain again.
Step 3 — Fill in the install details. This is the main setup form. It asks for more than a typical 1-Click app because it's setting up two things at once — the WordPress software itself, and the MySQL database it stores your content in.
| Parameter | Type | Description |
|---|---|---|
Site Namerequired | text | A label for this deployment. Letters, numbers, and hyphens only — for example my-blog. |
PHP Version | choice | The version of PHP (the programming language WordPress is built in) to run. Pick the one marked with a star if you're unsure — it's the recommended default. |
MySQL Version | choice | The version of the MySQL database engine to pair with your site. Again, the starred option is the recommended default. |
Admin Emailrequired | The email address associated with your WordPress administrator account. | |
Admin Usernamerequired | text | The username you'll use to log into your WordPress admin dashboard. Defaults to admin. |
Admin Passwordrequired | password | The password for that same WordPress admin account. Choose a strong one — this protects your site's control panel. |
Database Passwordrequired | password | The password WordPress itself will use, behind the scenes, to talk to its MySQL database. You won't normally need to type this in yourself again. |
MySQL Root Password | password | An optional, more powerful database password. Leave it blank and NevTan generates one for you automatically. |
Database Name | text | The name of the database WordPress will store its content in. Defaults to wordpress if left blank. |
Database User | text | The database account name WordPress will connect with. Defaults to wpuser if left blank. |
Server Configurationrequired | choice | A required pick from a set of cards, each showing the memory, CPU, and storage it includes, plus its monthly price — pick the one that fits your expected traffic. |
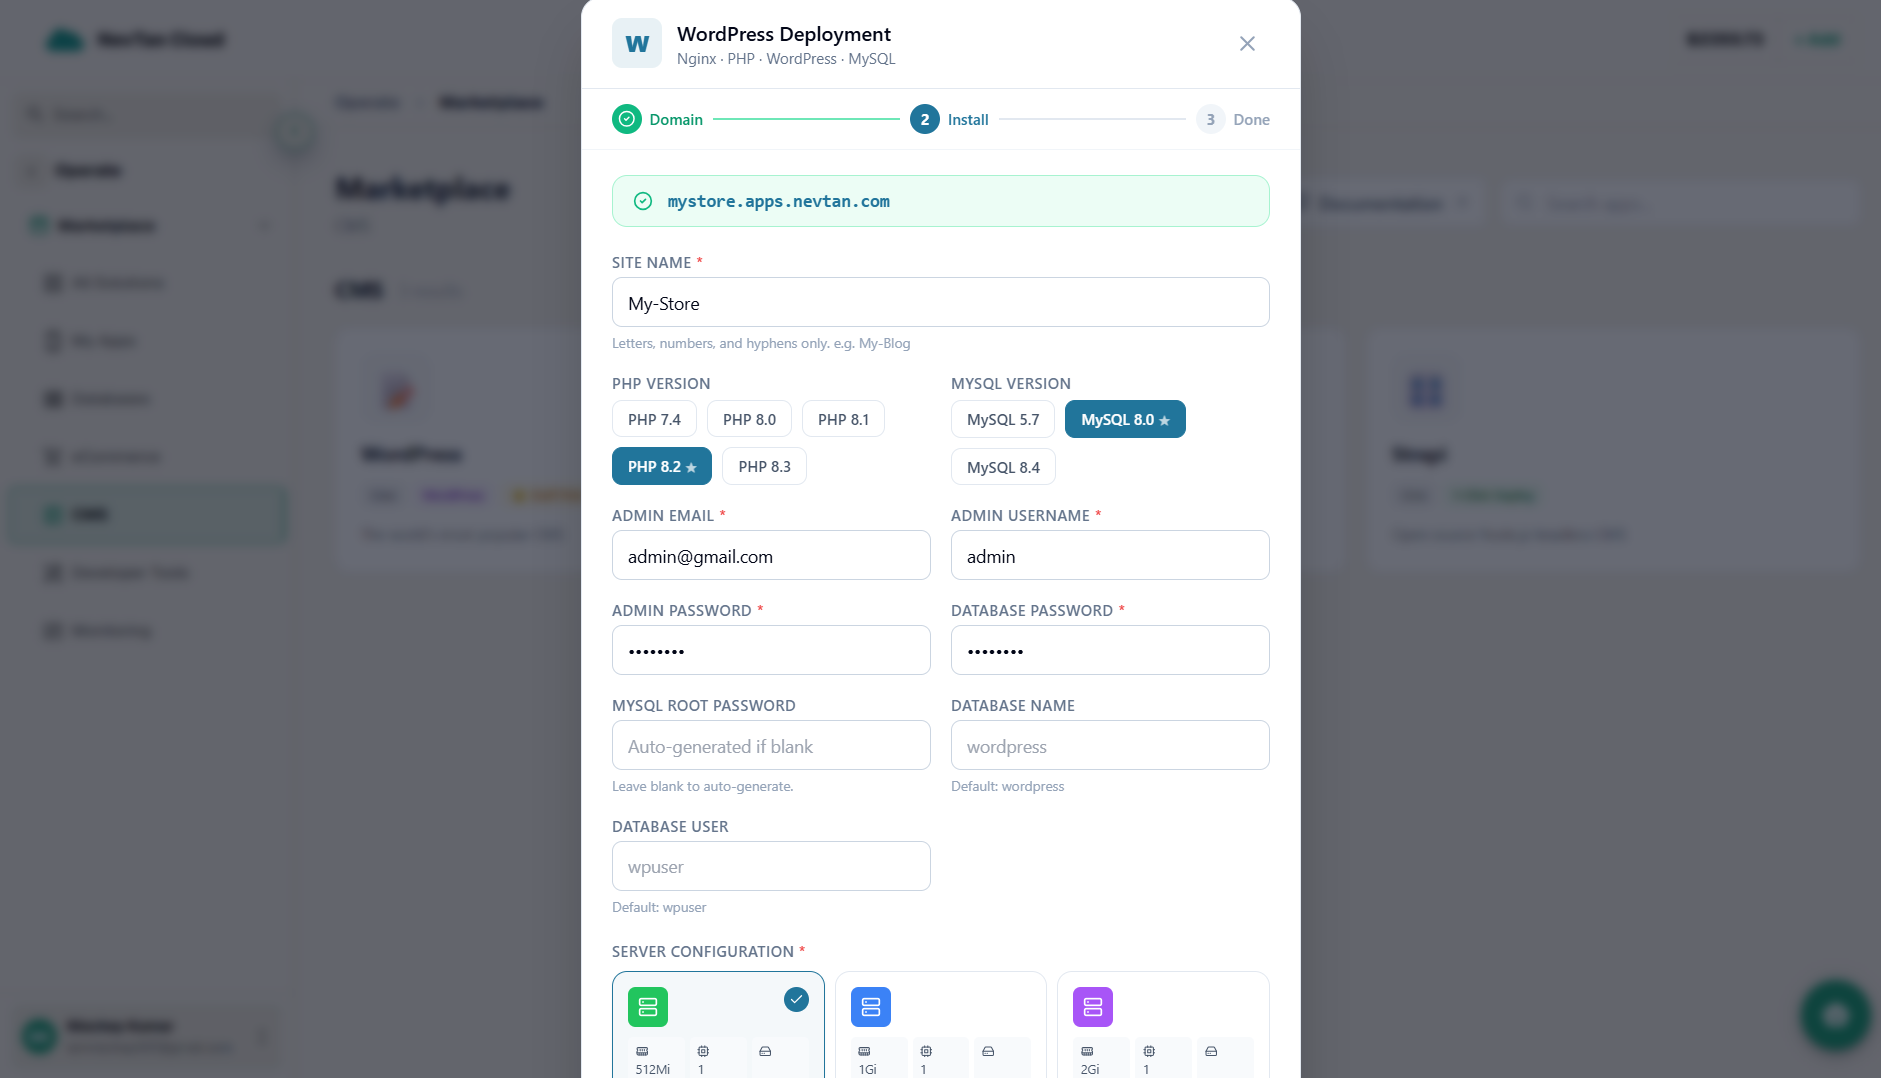
Once every required field is filled in and a Server Configuration is selected, click 🚀 Install WordPress on Server.
Step 4 — Watch it install. This screen shows a status line at the top (for example "Provisioning environment…") and a live, scrolling log of exactly what's happening — installing Nginx (the web server), PHP, MySQL, and finally WordPress itself. This step typically takes about 2 to 4 minutes.
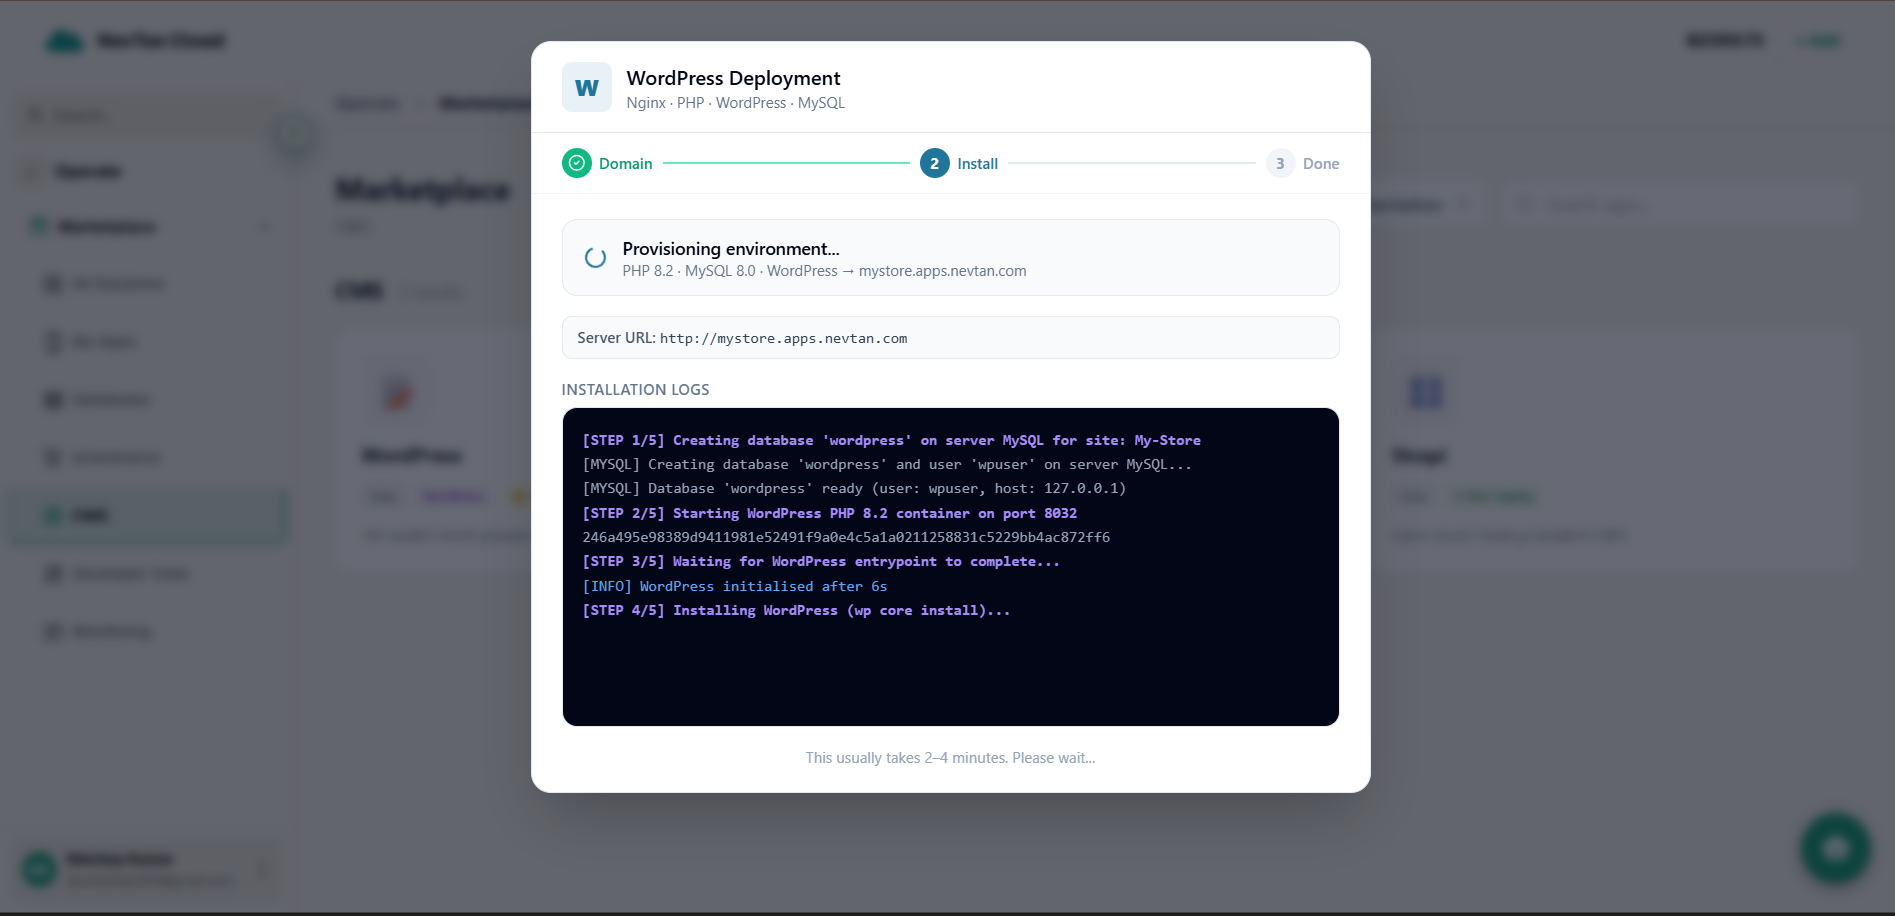
Step 5 — Finish WordPress's own setup. Once installation finishes, you'll see a success screen with your site's web address(es) and an Open WordPress Setup button. Clicking it opens WordPress's own, separate installation screen in a new tab — the same one every WordPress site in the world shows on first run. NevTan has already prepared the server and the database for you; this last screen is WordPress itself confirming your site title and admin details before your site is fully ready to use.
Understanding a failed deployment
Any of the three guides above can end in a failed status instead of succeeding. This isn't something to worry about — it usually just means a transient issue during setup, not a problem with your account.
- Open the deployment's logs (for 1-Click and database apps) or the installation log (for WordPress) to see what was happening when it failed.
- Try again — sometimes simply retrying, or picking a different region or resource size, resolves it.
- If it keeps failing the same way, that's worth reaching out about rather than repeatedly retrying the same configuration.
Finding your deployment afterward
Once something is deployed, here's where to find it again:
- Managed databases — appear in the dedicated Databases section of the console, alongside any database you created directly from there.
- 1-Click Deploy apps — appear under Your Deployments in the Marketplace tab; each entry links straight to its logs, domain, and resource settings.
- WordPress and WooCommerce sites — the success screen's "Go to Dashboard" button takes you back to your main console, where the new site behaves like any other project.